I recently returned from a week’s vacation in Texas. Because my husband was traveling there on business, I knew we wouldn’t have time to do a lot, but I wanted to create a vacation memento to commemorate the fun things we would do. I knew I wouldn’t have enough photos and stories to create a photo album, so I went online to find some creative ideas.  I loved what I found at I Choose Me. Denise shared three different ways to use postcards to preserve vacation memories along with links to detailed tutorials. I instantly got excited about the washi-bound postcard book idea originally posted by Carrie at Dream Green DIY.
Step 1: Collect postcards.
The first step was to collect postcards throughout the trip. As we wandered, I kept my eyes open for gift shops and memorabilia stands to buy postcards depicting the fun things we were experiencing each day.
At the end of the trip, there were a few postcards I wanted but never found, so I printed a few of my husband’s pictures on white cardstock and cut them postcard size.
Step 2: Journal.
While my husband was working, I took a little time each day to journal about our events on the back of each postcard. Denise at I Choose Me provided some helpful prompts such as what we ate, the funny things that happened, and what mishaps occurred. Because it was just a postcard, I was not intimidated about having to journal an entire page. There was just enough room to share our silly yet memorable adventures.
I will point out that I turned the postcards upside-down to write on the back. I knew I would be binding them into a book with washi tape, and I wanted the writing and the next postcard (next page) to be going the same direction.
 Step 3: Connect the postcards.
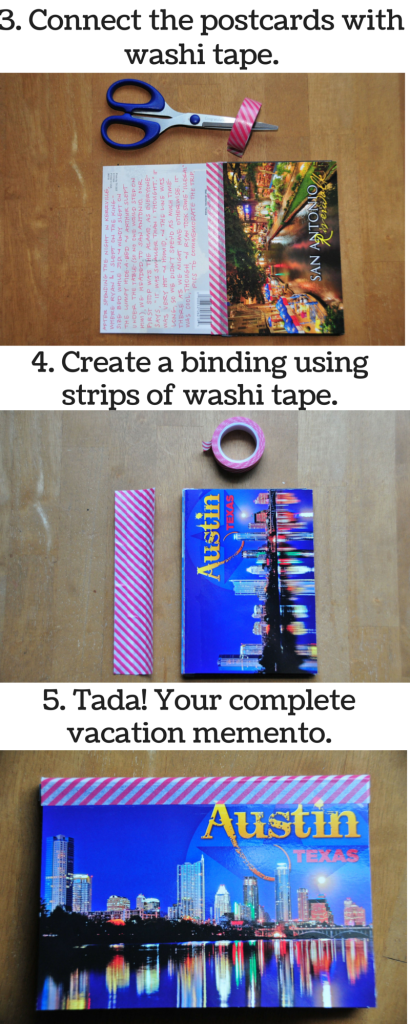
Once you put the postcards in order and journal on them, you are ready to start attaching them to create your book. Simply connect one postcard to the next using a strip of washi tape. Continue until all of the postcards are attached.
Note: If I were to do it again, I might prefer to have the words describing the postcard attached to it, instead of the one on the opposite side of the postcard. However, that would mean I needed to decide the exact order of the postcards before I started journaling. Because I added some of my husband’s photos (and also found a great postcard at the airport on our way home to add to my collection), that wouldn’t have worked so well for me. It is just something I would take time to consider next time.
Step 4: Create a binding.
Connect multiple strips of washi tape side-by-side, overlapping enough to stick together, to create a binding that is wide enough to go around the edge of your stack of postcards. Then place more strips of washi tape on the sticky side of the binding. This will keep your postcards from sticking to the binding as you turn the pages.
Then use a few more strips of washi tape to connect the binding to the front and the back of your postcard book.
Step 5: Enjoy your memento!
Because I had purchased the postcards and journaled on them while in Texas, creating this memento literally took less than 30 minutes to create (including printing a few extra photo “postcards” and adding the extra journaling). I was able to enjoy and share my vacation memento before I had even finished my first load of laundry!
I would be remiss if I didn’t mention that the postcard size is so convenient. It is easy to display on an end table or shelf in the living room, but I can just as easily stick it in my purse to share on the go.
Thank you to Denise at I Choose Me and Carrie at Dream Green DIY for the great idea. I love it!
How do you create mementos to share your vacation memories?


Amy, I’m glad you liked the idea of using postcards to preserve vacation memories. Carrie’s tutorial makes the washi tape postcard book a simple option. I’m intrigued by your post on creating cards using a vellum overlay. We’ll see what I come up with. Denise
Denise, I really appreciate you sharing the idea. It is definitely something I will do again. I hope you enjoy the vellum cards; you’ll have to let me know how it goes!