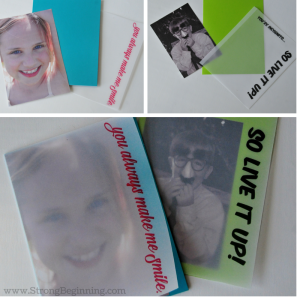
I went to the store the other day to buy a variety of greeting cards, and I was astonished by the bill. It is amazing how expensive it has become to show someone you care. One of the cards I really liked featured a black and white photo covered by a piece of vellum with a printed message on it. I decided I could create similar cards for a fraction of the price.
Step 1: GATHER YOUR SUPPLIES
The first step is to decide what size card(s) you want to create. If you have any blank colored note cards, those would work great. If not you could use 8.5″ x 11″ card stock to fold in half for large cards, or if you cut them in half, you would get 4.25″ x 5.5″ cards which fit a standard A2 envelope.
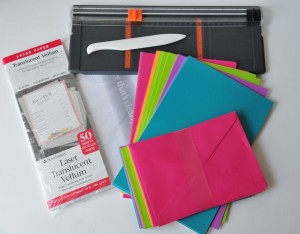
In addition to cards, you will need vellum, a paper cutter (or scissors), adhesive, and a bone folder (or some other tool to help precisely fold the vellum).
Step 2: CHOOSE YOUR PHOTO
If you have printed photos on hand, you could simply adhere the photo to the front of your card. Or if your desired photo is digital, resize it to the appropriate size and print it in color or black and white if you prefer. While standard printer paper will suffice for the photo, the colors and contrast seem to be a little richer if you happen to have nice photo paper for your printer.
Step 3: DECORATE YOUR VELLUM
Here you have three different options.
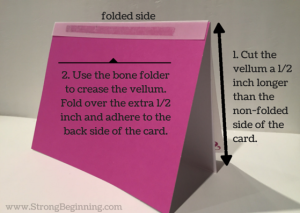
 1. Plain: If you don’t want to print anything on the vellum, cut the vellum vellum so it is 1/2″ longer than the non-folded side of your card. Use a bone folder to mark a line on the vellum that matches the card size. Once folded, use an adhesive on the 1/2″ strip to attach the vellum to the back side of the card as shown. (Caution: I initially used the scoring blade on my paper cutter to mark the fold line on the vellum instead of a bone folder, but the vellum “broke” when I folded it. The bone folder worked much better.)
2. Computer: Once you know what you want to print on the vellum, measure on your card/photo where you want the text to appear. (Remember you need to account for an extra 1/2″ on the non-folded side of your card.) Use a drawing or word processing program to type the text in the appropriate place. Print your text on the vellum, then cut and adhere the vellum (as described above).
3. By Hand: You can use Sharpies or any other colored marker to write your text and/or draw decorative touches on the vellum. You could even use glitter glue to write or draw on it. Then cut and adhere the vellum (as detailed above).
Step 4: ENJOY YOUR CARDS (AND THE EXTRA $$$ IN YOUR POCKET!)

Here is the cost of my supplies. The colored note cards normally come in packs of anywhere from 10-50 cards. I purchased a pack of 50 for about $13. I chose a pack of 50 sheets of translucent laser vellum paper for $14. The bone folder was just under $5. So my grand total was a little less than $32. I have supplies for 50 cards (with leftover vellum and a bone folder for life), making the cost per card $0.64, which is about an 85% savings compared to the cards I purchased at the store.
What type of cards do enjoy creating?
Here is a link to supplies if you need them.


Leave a Reply